Guix Introduction Part 6: R Development with Guix
Contents
This is the sixth part of a brief introduction to the Guix functional package manager, and how it could be used to manage dependencies of projects, much like virtual environments for Python, but with much larger scope.
This time we explore some ways to use Guix for per-project dependency management, for R development using Emacs, Jupyter lab, VSCode, and Sublime Text 3. Here we demonstrate with Guix running inside qemu VM in MacOS. This setup should work for either local development with Linux host running Guix package manager, or when connecting to a remote server running Guix package manager. Although we focus on R development for data science projects, similar setup should also work for Python or other languages.
Basic Idea
In previous posts (e.g. Guix Introduction Part 5: Per-Project
Dependency Management), we introduced guix environment together with
guix time-machine to use a manifest file (pkgs.scm) for packages
and a channel file (channels.scm) for exact package versions, to
create a shell with per-project dependencies. It is intuitive that if
we somehow spawn a shell with the needed R version and other
dependencies, and point the development tool (IDE or text editors) to
the proper R, then things should work as usual.
Depending on the way that the development tool connects to R, there are two ways that this can work interactively and one way for batch jobs:
-
Interactive: First spawn a shell with needed dependencies, then start the tool
- Some development tools (by default) simply look up the R
executable or R kernel from
PATH, e.g. Emacs, Vim or Neovim, RStudio desktop version, Jupyter lab etc. Therefore one way is to first spawn the shell usingguix time-machineandguix environment(or the prepared alias or helper script, as we show below), then start the tool inside this shell. - The downside is that you would need to restart your development
tool if the dependencies is changed in the middle of development,
e.g. while your are writing some code, then realize that you need
to use another R package not listed in the manifest file, then
you would need to:
- exit the development tool and the spawn shell
- edit the manifest file
pkgs.scmto add the R package - respawn the shell
- restart the development tool
- Some development tools (by default) simply look up the R
executable or R kernel from
-
Interactive: First start the development tool, then start R through a wrapper script to first spawn the shell with needed dependencies, possibly manually in a terminal.
- Some tools such as VSCode or Sublime Text have plugins that can start a terminal, and send code from the editor to the terminal through hotkey. Therefore, we can start a terminal from within the tool, then spawn a shell with needed dependencies within the terminal and start R, and after that we should be able to code as usual, but with the needed dependencies.
- In tools such as VSCode and Sublime Text, this is easier than
pointing the R executable to be calling a wrapper script that
starts R inside a
guix environment. - However, in Emacs, we could just as easily point the R
executable to a wrapper script to start R inside a
guix environment, and then can operate just as usual. - The downside (not applicable to the Emacs case) of starting R in
the terminal is that there is less integration with the editor in
terms of auto-completion. E.g. if you create some variables in the
R session, then back in the editor, the newly created variable is
not available for completion. For better integration, we may need
to use LSP (
languageserverpackage in R), but so far I have not completely figured it out yet.
-
Batch job: The way for batch job is to simply run R script inside the spawn Guix environment using
guix environmentandguix time-machine.- The downside is that this is not interactive development, which is very different from the usual R practice of using REPL. Therefore this is more suitable for running always tested R scripts.
Setup Guix
For completeness, we describe the setup of the Guix package manager on a foreign distribution, in particular, on Debian in a VM. The same should work on Guix system (i.e. the Guix Linux distribution).
Install Debian VM
-
Download Debian 10 from https://www.debian.org/
-
Follow Guix Introduction Part 4: Try Guix to use the debian-10.8.0-amd64-netinst.iso to install on a 50G qcow2 disk using qemu, but you can also choose to install Debian using other virtual machine (such as virtualbox), or install on physical machine. E.g. we create an image file
debian-10.8.0-guix.img, using the qcow2 format with a capacity of 50G by:1qemu-img create -f qcow2 debian-10.8.0-guix.img 50GThen start qemu and proceed with normal Debian installation.
-
Here we use the user name
guestfor the VM, you may choose your own user name, but make sure you change the subsequent commands accordingly. -
It suffices to have a minimal install without desktop environment, but with ssh server. You may optionally choose to install a desktop environment.
-
Install ssh server and
git, also add the user to sudoer:1 2 3 4 5 6 7 8apt-get update apt-get install git apt-get sudo # add to sudoer usermod -a -G sudo guest # ssh server apt-get install openssh-server sudo systemctl enable ssh -
Config ssh
-
Reference: https://devconnected.com/how-to-install-and-enable-ssh-server-on-debian-10/
-
Add
PermitRootLogin noto/etc/ssh/sshd_config -
Forward port 10022 (you can choose a different port, and adjust the following accordingly) to 22 in qemu by adding
-net user,hostfwd=tcp::10022-:22to the qemu invocation command, e.g.1 2 3 4 5 6qemu-system-x86_64 \ -nic user,model=virtio-net-pci \ -enable-kvm -m 1024 \ -net user,hostfwd=tcp::10022-:22 \ -device virtio-blk,drive=myhd \ -drive if=none,file=./debian-10.8.0-guix.img,id=myhd -
Generate ssh key to conveniently login to the VM
-
Reference: https://devconnected.com/how-to-set-up-ssh-keys-on-debian-10-buster/
-
In the VM
1 2# generate ssh key, save to id_vm_rsa ssh-keygen -t rsa -b 4096 -C "guest@debianguix.org" -
In the host, follow the above reference to copy the ssh key to the host
-
-
Add to
~/.ssh/configin the host for convenience, so that we can ssh into the VM with justssh vm- Reference https://www.xmodulo.com/how-to-speed-up-x11-forwarding-in-ssh.html?format=pdf
- Add to
~/.ssh/config(adjust thePortto be the same as the forward port in qemu, and theUserto be your chosen user name):
1 2 3 4 5 6 7 8 9 10 11 12 13Host vm HostName localhost Port 10022 AddKeysToAgent yes UseKeychain yes User guest ForwardX11 yes Compression yes # Ciphers blowfish-cbc,arcfour # your ssh client may not support the particular cipher, check with "ssh -Q cipher" ConnectTimeout 20 StrictHostKeyChecking no UserKnownHostsFile /dev/null IdentityFile ~/.ssh/id_rsa
-
-
This should finish the setup of a Debian 10 VM with ssh, test that you can ssh into the VM without typing password by:
1ssh vm
Install Guix package manager
We use the installation script to install Guix package manager:
- Reference: https://guix.gnu.org/manual/en/guix.html#Binary-Installation
- Steps:
-
Run as root:
1 2 3 4 5 6apt-get install gpg cd /tmp wget https://git.savannah.gnu.org/cgit/guix.git/plain/etc/guix-install.sh chmod +x guix-install.sh ./guix-install.sh # import the gpg key as instructed, then run the script again -
Change Debian locale to
en_US.utf8, but select “None” as the default- Follow instructions in https://wiki.debian.org/Locale
-
Install Guix locale as user
1guix install glibc-locales -
(Optional) Add to
~/.bashrcfor a different prompt when in a Guix environment:1 2 3 4 5if [ -n "$GUIX_ENVIRONMENT" ] then export PS1="\u@\h \w [dev]\$ " fi -
Add to
~/.profile(or~/.bash_profile)1 2 3 4export GUIX_LOCPATH=$HOME/.guix-profile/lib/locale GUIX_PROFILE="/home/guest/.guix-profile" . "$GUIX_PROFILE/etc/profile"
-
Setup for different tools
Common things for convenience
Script to start environment
A convenient way to start the guix environment using guix time-machine is useful.
- the simplest way:
-
add a shell alias, assuming we always place the channels file
channels.scmand manifest filepkgs.scmat project root, we may use an alias such as:1alias work="guix time-machine -C channels.scm -- environment --ad-hoc -m pkgs.scm" -
this method is simple but assumes the locations of the channels and manifest file.
-
- a more flexible way:
- prepare a command (call it
work) in the VM as an executable shell script-
purpose:
- find
channels.scmandpkgs.scmfrom the current directory up to root - spawn Guix environment
- the command also allows extra arguments to be passed, e.g. to execute vim
- find
-
put at
/usr/local/bin/workthe following file1 2 3 4 5 6 7 8 9 10 11 12 13 14 15 16 17 18 19 20 21 22 23 24 25#!/bin/bash # adapted from https://unix.stackexchange.com/a/22215 findup () { if [ -e "./$1" ] then echo "." else path=$(pwd) while [[ "$path" != "" && ! -e "$path/$1" ]]; do path=${path%/*} done echo "$path" fi } cfpath=$(findup channels.scm) pfpath=$(findup pkgs.scm) # https://unix.stackexchange.com/a/415028 channel_file=${cfpath:+${cfpath}/}channels.scm pkgs_file=${pfpath:+${pfpath}/}pkgs.scm exec guix time-machine -C "${channel_file}" -- environment --ad-hoc -m "${pkgs_file}" "$@" -
make it executable:
1chmod +x /usr/local/bin/work
-
- advantage: can easily allow different manifest files or channels files at different subdirectores, should that be needed.
- prepare a command (call it
Script to start R (optional)
- optionally prepare a command (call it
rwork) in the VM to call R in the spawn environment-
useful for starting R in
ESSwithinemacs -
put at
/usr/local/bin/rwork, and make it executable1 2 3 4 5#!/bin/bash # add r-dt for DT to be loadable exec work r-dt -- R --no-save "$@"
-
Script to start radian (optional)
Some may prefer radian to plain R console, especially when explicitly starting R in terminal, e.g. for use in Sublime Text and VSCode.
- prepare radian in VM
- tried but encountered problems in Debian 10 VM:
- tried installing
radianfrom pypi, but encountered glibc version mismatch when in different Guix environment - so also tried installing radian in guix, but seems still may have glibc version mismatch unless we build the radian together with the environment
- tried installing
- one tried method that works: add
radianto Guix and add it to the package list in theguix environment:-
radianis not currently (at the time of writing) in the official Guix repository, so we import it withguix import pypi -r radianto get a skeleton, but need some fiddling to get it to build:- need to add importing of gnu modules at the top
- need to disable the tests in the few packages including
radian,rchitect,lineeditto build without error - need to fix some inputs, especially
python-pytest-runner - need to use newer version of
python-pyte(at least 0.8.0), so included a modified definition ofpython-pyte
-
the resulting file: to be put in the VM as
~/extra/radian.scm1 2 3 4 5 6 7 8 9 10 11 12 13 14 15 16 17 18 19 20 21 22 23 24 25 26 27 28 29 30 31 32 33 34 35 36 37 38 39 40 41 42 43 44 45 46 47 48 49 50 51 52 53 54 55 56 57 58 59 60 61 62 63 64 65 66 67 68 69 70 71 72 73 74 75 76 77 78 79 80 81 82 83 84 85 86 87 88 89 90 91 92 93 94 95 96 97 98 99 100 101 102 103 104 105 106 107 108 109 110 111 112 113 114 115 116 117 118 119 120 121 122 123 124 125 126 127 128 129 130 131 132 133 134 135 136 137 138 139 140(use-modules (guix) (guix licenses) (guix download) (guix git-download) (gnu packages statistics) (gnu packages python) (gnu packages python-science) (gnu packages python-xyz) (gnu packages libffi) (gnu packages check) (gnu packages terminals) (guix build-system python)) (define-public python-lineedit (package (name "python-lineedit") (version "0.1.6") (source (origin (method url-fetch) (uri (pypi-uri "lineedit" version)) (sha256 (base32 "0gvggy22s3qlz3r5lrwr5f4hzwbq7anyd2vfrzchldaf2mwm8ygl")))) (build-system python-build-system) (arguments `(#:tests? #f)) (propagated-inputs `(("python-pygments" ,python-pygments) ("python-six" ,python-six) ("python-wcwidth" ,python-wcwidth))) (native-inputs `(("python-pexpect" ,python-pexpect) ("python-ptyprocess" ,python-ptyprocess) ("python-pyte" ,python-pyte) ("python-pytest" ,python-pytest) ("python-pytest-cov" ,python-pytest-cov))) (home-page "https://github.com/randy3k/lineedit") (synopsis "An readline library based on prompt_toolkit which supports multiple modes") (description "An readline library based on prompt_toolkit which supports multiple modes") (license #f))) (define-public python-rchitect (package (name "python-rchitect") (version "0.3.30") (source (origin (method url-fetch) (uri (pypi-uri "rchitect" version)) (sha256 (base32 "1bg5vrgp447czgmjjky84yqqk2mfzwwgnf0m99lqzs7jq15q8ziv")))) (build-system python-build-system) (arguments `(#:tests? #f)) (propagated-inputs `(("python-cffi" ,python-cffi) ("python-six" ,python-six))) (native-inputs `(("python-pytest" ,python-pytest) ("python-pytest-runner" ,python-pytest-runner) ("python-pytest-cov" ,python-pytest-cov) ("python-pytest-mock" ,python-pytest-mock))) (home-page "https://github.com/randy3k/rchitect") (synopsis "Mapping R API to Python") (description "Mapping R API to Python") (license #f))) (define-public python-pyte (package (name "python-pyte") (version "0.8.0") (source (origin (method url-fetch) (uri (pypi-uri "pyte" version)) (sha256 (base32 "1ic8b9xrg76z55qrvbgpwrgg0mcq0dqgy147pqn2cvrdjwzd0wby")))) (build-system python-build-system) (arguments '(#:phases (modify-phases %standard-phases (add-after 'unpack 'remove-failing-test ;; TODO: Reenable when the `captured` files required by this test ;; are included in the archive. (lambda _ (delete-file "tests/test_input_output.py") #t))))) (propagated-inputs `(("python-wcwidth" ,python-wcwidth))) (native-inputs `(("python-pytest-runner" ,python-pytest-runner) ("python-pytest" ,python-pytest))) (home-page "https://pyte.readthedocs.io/") (synopsis "Simple VTXXX-compatible terminal emulator") (description "@code{pyte} is an in-memory VTxxx-compatible terminal emulator. @var{VTxxx} stands for a series of video terminals, developed by DEC between 1970 and 1995. The first and probably most famous one was the VT100 terminal, which is now a de-facto standard for all virtual terminal emulators. pyte is a fork of vt102, which was an incomplete pure Python implementation of VT100 terminal.") (license lgpl3+))) (define-public python-radian (package (name "python-radian") (version "0.5.10") (source (origin (method url-fetch) (uri (pypi-uri "radian" version)) (sha256 (base32 "0plkv3qdgfxyrmg2k6c866q5p7iirm46ivhq2ixs63zc05xdbg8s")))) (build-system python-build-system) (arguments `(#:tests? #f)) (propagated-inputs `(("python-lineedit" ,python-lineedit) ("python-pygments" ,python-pygments) ("python-rchitect" ,python-rchitect) ("python-six" ,python-six))) (native-inputs `(("python-coverage" ,python-coverage) ("python-pexpect" ,python-pexpect) ("python-ptyprocess" ,python-ptyprocess) ("python-pytest-runner" ,python-pytest-runner) ("python-pyte" ,python-pyte) ("python-pytest" ,python-pytest))) (home-page "https://github.com/randy3k/radian") (synopsis "A 21 century R console") (description "A 21 century R console") (license #f))) ;; python-radian- this file can be added to
guix environmentcall with the-loption, so that radian is built together with other packages for the project
- this file can be added to
-
- tried but encountered problems in Debian 10 VM:
- prepare an executable shell script (call it
rdwork) in the VM to callradianin the spawn environment-
put at
/usr/local/bin/rdworkthe following file, and make it executable:1 2 3 4 5#!/bin/bash # add r-dt for DT to be loadable exec work r-dt -l ~/extra/radian.scm -- radian "$@"
-
X forwarding settings (optional)
X forwarding may come into handy for viewing plots, or viewing data frames through R DT.
- on Mac host, install XQuartz
- refer to https://www.xquartz.org/
- add
xhost + 127.0.0.1to the qemu starting script, before starting the VM - use X forwarding in ssh
- either use
ssh +XC vmto connect, or - add
ForwardX11 yesto~/.ssh/configas shown above
- either use
- (optional) for R
DTto work inside VM, do these inside the VM-
install a web browser:
-
e.g. Firefox
1sudo apt-get install firefox-esr -
or you may choose a more light-weight browser such as midori, which can and should be installed through Guix (to avoid dynamic library problem in different Guix environment):
1guix package -i midori
-
-
DT needs the “browser” option to point to a browser, e.g. firefox. You may add the following to
~/.Rprofile, create the file~/.Rprofileif it does not exist:1 2 3 4 5 6# for DT::datatable to work, you may use other browser you like, if it is installed in the system options(browser = "midori") # alternative # options(browser = "firefox") # alternative # (optional) can consider overriding View as DT::datatable for convenience, as the default View is not very good in X forwarding if(requireNamespace("DT", quietly = T)) {View <- DT::datatable}
-
Jupyter lab
Idea
- to install Jupyter lab in the VM, to use with R kernel
- then use
workto get the Guix environment we want, to start Jupyter - then connect from browser with port forwarding, then we have nice graphics, just as with any Jupyter notebook
Setup
- side note: one way is to use
guix-jupyter- reference: https://hpc.guix.info/blog/2019/10/towards-reproducible-jupyter-notebooks/
- it allows specifying Guix environment within the notebook itself
- so can pin the versions of the needed packages
- but this will then be different from using other approaches here
- so this method is for reference, and left for the reader to explore
- for consistency, the Jupyter and R kernels should be
installed in the same Guix environment along with other
project packages
-
basically we need
jupyterr-irkernelfor the R kernelr-irdisplayfor rich display capabilities- Optionally,
python-ipykernelfor python kernel
-
so prepare an executable shell script at
/usr/local/bin/jrworkwith the following:1 2 3 4 5#!/bin/bash # add those for jupyter exec work jupyter r-irkernel r-irdisplay -- jupyter notebook "$@"
-
Usage
-
start the VM
-
ssh into the VM, e.g. with the above convenient setup
1ssh vm -
go to the project directory
-
start jupyter with dependencies using
jrwork
Figure 1: Start Jupyter in Guix environment
-
once jupyter is started, note the port number of the url, which may be different in different invocations e.g. if the link is “http://localhost:8888/?token=05d71e9d8a6a687be01e307aba974f88b4834cf9f7ca1ba9 the port inside VM is 8888
-
do ssh port forwarding
-
reference: https://www.ssh.com/ssh/tunneling/example
-
the easiest way is to map the same port number in your local machine to the port number inside VM, but you may choose a different port number (don’t choose a too small number, or it may be restricted by your OS)
-
in another terminal in you local machine, ssh with port forwarding
-
the general syntax of ssh port forwarding into the VM is
ssh -L xxx:localhost:yyy vm, wherexxxis the local port number you like, andyyyis the port number inside the VM, so for the above example of port 8888 and map to the same port, we would type in a new terminal and leave it open while working in Jupyter:1ssh -L 8888:localhost:8888 vm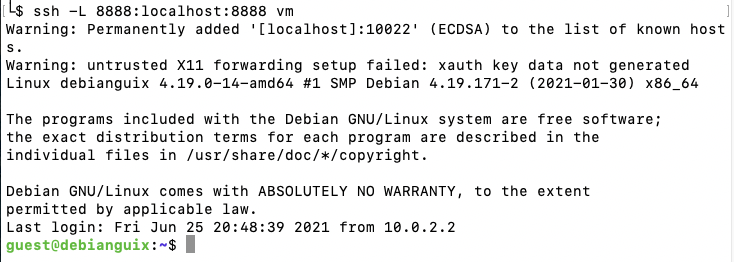
Figure 2: Port forwarding in ssh
-
-
browse the url for Jupyter
-
in your local browser, paste the link printed by Jupyter in the VM, but remember to change the port number to be your chosen local port number (if you choose a different port number)
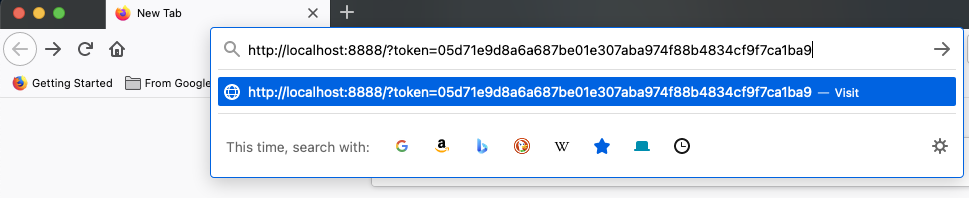
Figure 3: Browse URL of Jupyter
-
-
then start using Jupyter
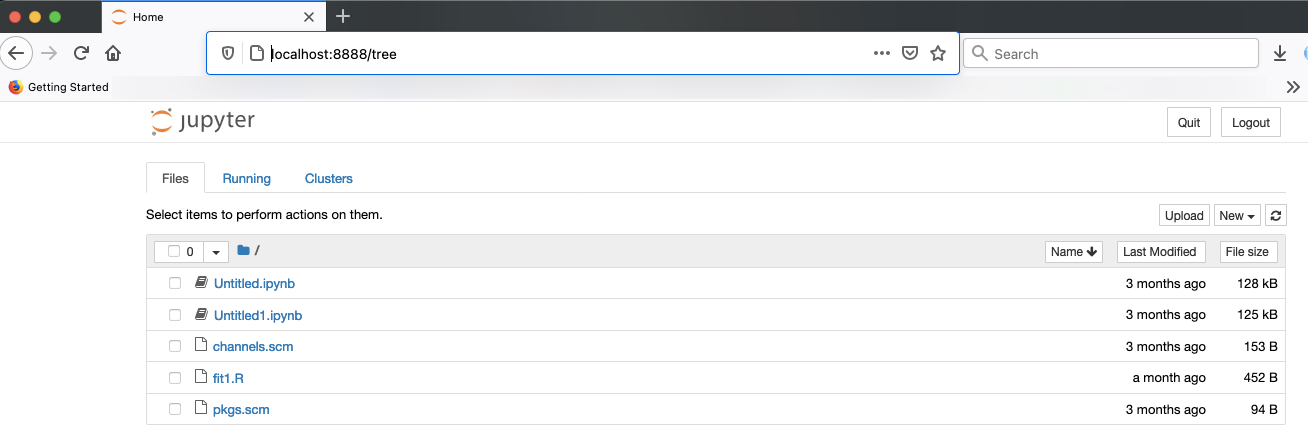
Figure 4: Open Jupyter

Figure 5: Open notebook and work
-
when done
- in the browser, press quit and logout
- close connection of the ssh for port forwarding
- exit the shell of Guix environment by pressing Ctrl+c
- close the original connection to the VM and exit if appropriate
VSCode
Idea
- can use Remote-SSH plugin
- which essentially will install a VSCode in the VM
- then allows us to use VSCode as if it is local
- then configure the remote one for R programming
- change the R executable name to be
rworkto use the proper dependencies using Guix
- change the R executable name to be
Setup
-
prepare for R
languageserverneeded for VSCode’s R LSP Client extension-
at the time of writing, R
languageserveris not in Guix’s official repository, so we import it from CRAN1guix import cran -r languageserver > r_languageserver.scm -
then need to add something at the top to use modules needed, and at the bottom to return the
r-languageserverpackage, to get a file that can be used inguix environmentto getlanguageserver, together with other project packages-
the modified file is put in the VM at
~/extra/r_languagerserver.scm:1 2 3 4 5 6 7 8 9 10 11 12 13 14 15 16 17 18 19 20 21 22 23 24 25 26 27 28 29 30 31 32 33 34 35 36 37 38 39 40 41 42 43 44 45 46 47 48 49 50 51 52 53 54 55 56 57 58 59 60 61 62 63 64 65 66 67(use-modules (guix) (guix licenses) (guix download) (guix git-download) (gnu packages cran) (gnu packages statistics) (guix build-system r)) (define-public r-collections (package (name "r-collections") (version "0.3.5") (source (origin (method url-fetch) (uri (cran-uri "collections" version)) (sha256 (base32 "053ig88pva78wxxwya3v7cz853k563dkpgxrf2xvd0l0d9fanxmz")))) (properties `((upstream-name . "collections"))) (build-system r-build-system) (home-page "https://github.com/randy3k/collections") (synopsis "High Performance Container Data Types") (description "This package provides high performance container data types such as queues, stacks, deques, dicts and ordered dicts. Benchmarks <https://randy3k.github.io/collections/articles/benchmark.html> have shown that these containers are asymptotically more efficient than those offered by other packages.") (license expat))) (define-public r-languageserver (package (name "r-languageserver") (version "0.3.9") (source (origin (method url-fetch) (uri (cran-uri "languageserver" version)) (sha256 (base32 "1acjzc8ar3y0g8prwnsp7k3mgvg01h73mnyb4q2s3r7wkb4aqhrv")))) (properties `((upstream-name . "languageserver"))) (build-system r-build-system) (propagated-inputs `(("r-callr" ,r-callr) ("r-collections" ,r-collections) ("r-desc" ,r-desc) ("r-fs" ,r-fs) ("r-jsonlite" ,r-jsonlite) ("r-lintr" ,r-lintr) ("r-r6" ,r-r6) ("r-repr" ,r-repr) ("r-roxygen2" ,r-roxygen2) ("r-stringi" ,r-stringi) ("r-styler" ,r-styler) ("r-xml2" ,r-xml2) ("r-xmlparsedata" ,r-xmlparsedata))) (home-page "https://github.com/REditorSupport/languageserver/") (synopsis "Language Server Protocol") (description "An implementation of the Language Server Protocol for R. The Language Server protocol is used by an editor client to integrate features like auto completion. See <https://microsoft.github.io/language-server-protocol/> for details.") (license expat))) ;; r-languageserver
-
-
create an executable shell script at
/usr/local/bin/rcwork, to add loading oflanguageserverwith R:1 2 3 4#!/bin/bash exec work r-dt -l ~/extra/r_languageserver.scm -- R --no-save "$@" -
(Optional) create an executable shell script at
/usr/local/bin/rcdwork, to add loadinglanguageserverandradian:1 2 3 4#!/bin/bash exec work r-dt -l ~/extra/r_languageserver.scm -l ~/extra/radian.scm -- radian "$@" -
you are advised to run
rcworkandrcdworkat least once in the project directory before proceeding, because building or downloading the packages needed forlanguageservercan take a while
-
-
install VSCode
- reference: https://code.visualstudio.com/Download
-
install Remote-SSH extension in VSCode
-
search “Remote-SSH” in the extension icon in the left bar
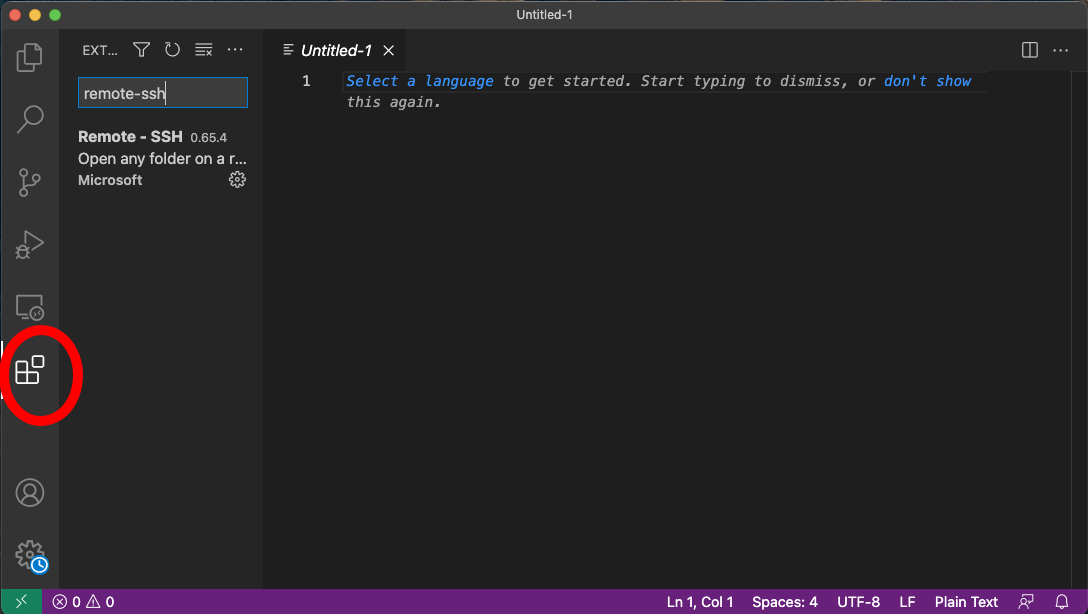
Figure 6: Install extension in VSCode
-
then click “install”
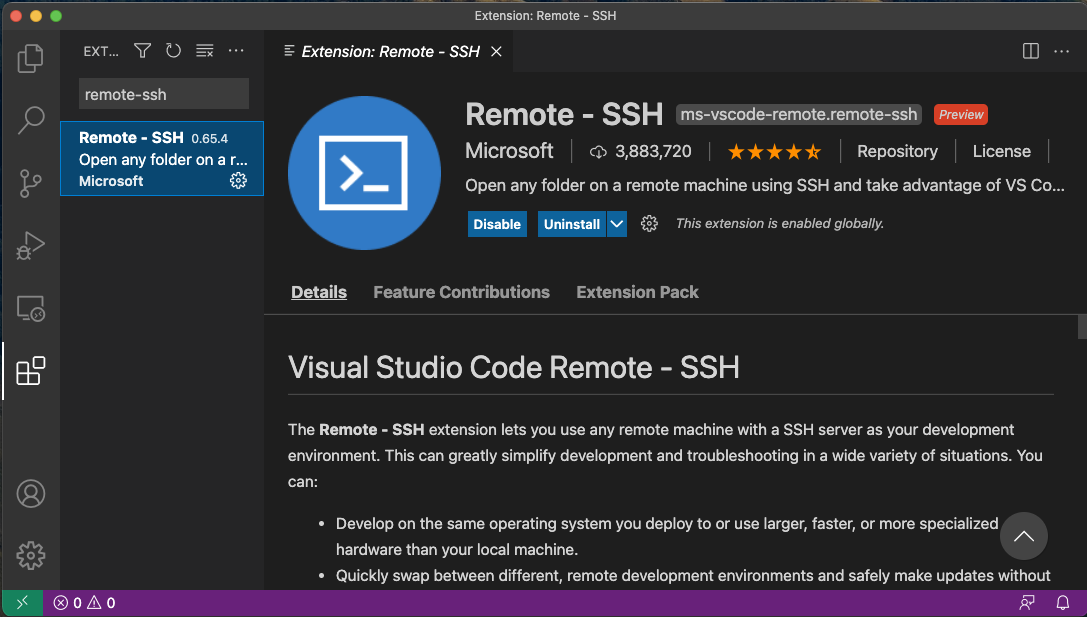
Figure 7: Install Remote-SSH extension
-
then click the green “Open a Remote Window” icon at the bottom left corner to switch to the remote instance
-
select “Connect to Host” or “Connect Current Window to Host”
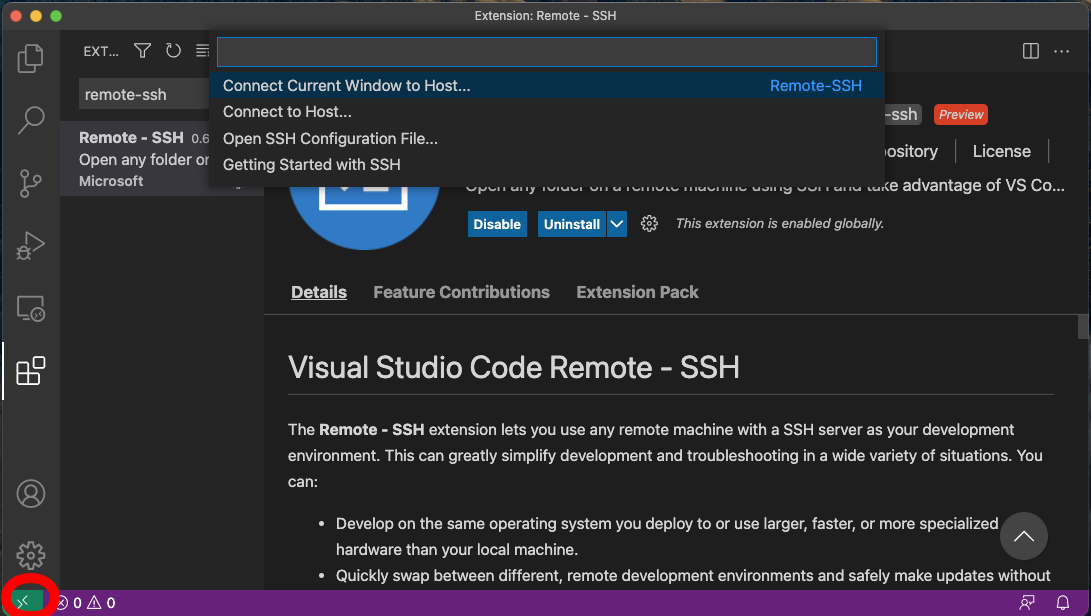
Figure 8: Connect to remote through SSH inside VSCode
-
then select “vm” if you have already configured
.ssh/configas above; otherwise you may configure it here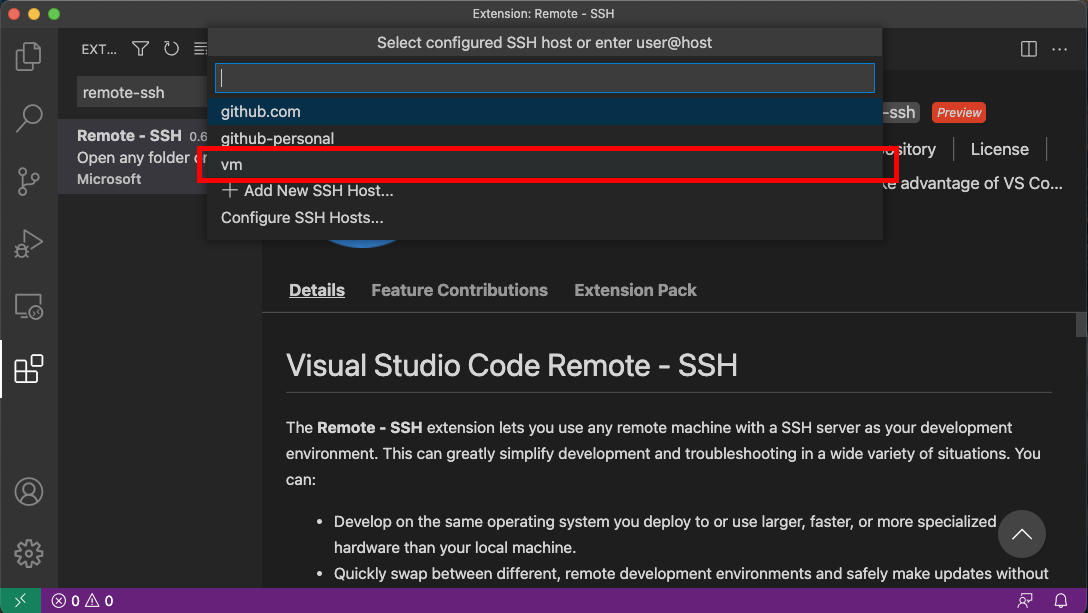
Figure 9: Connect to VM
-
if the bottom left green icon shows something like “SSH: vm”, then you have successfully connected to the remote instance
-
-
-
setup the remote VSCode environment for R
-
reference: https://www.r-bloggers.com/2021/01/setup-visual-studio-code-to-run-r-on-vscode-2021/
-
install VSCode R extension
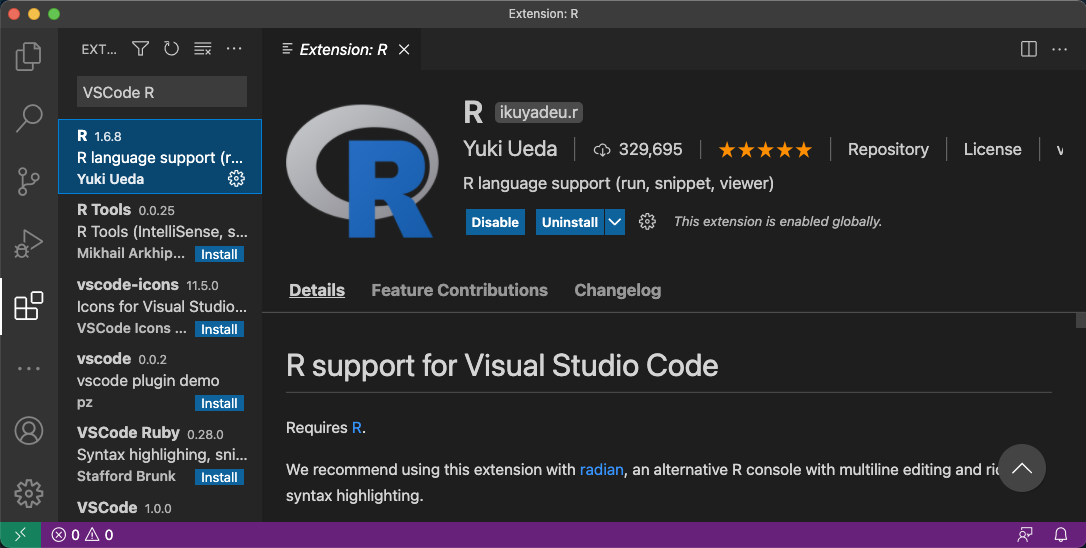
Figure 10: Install VSCode R extension
-
install R LSP Client extension
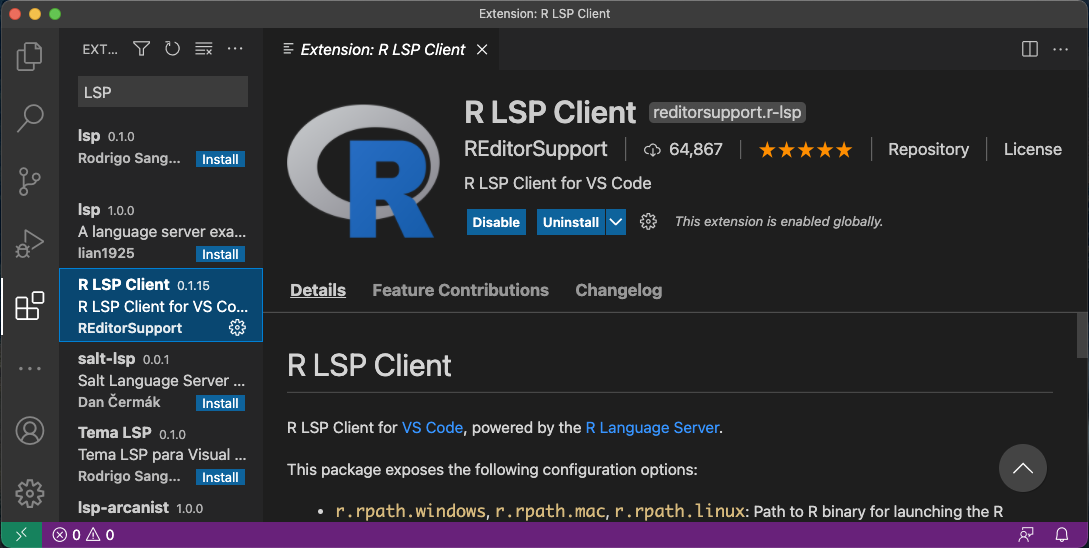
Figure 11: Install R LSP Client extension
-
install
languageserverin R (needed for R LSP Client)- should have been setup above
-
install
radian- should have been setup above
-
enable
r.bracketedPastefor using Radian-
goto settings: menu “Code” -> “Preferences” -> “Settings”, or use the shortcut
-
search
r.bracketedPaste, and make sure it is enabled (ticked)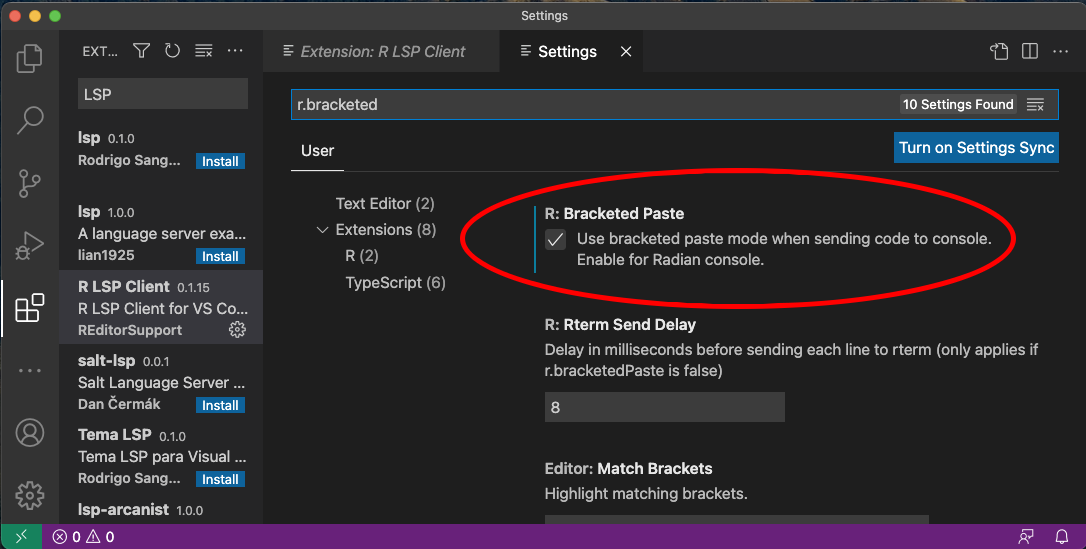
Figure 12: Extension settings
-
-
enable
r.alwaysUseActiveTerminalif we were to manually start R in the terminal- goto settings
- search
r.alwaysUseActiveTerminal, tick the box to set it toTrue
-
Set up
r.rpath.windows,r.rpath.mac,r.rpath.linux: Path to R orradian- go to settings
- search
r.rpath.linux, change it to/usr/local/bin/rcworkor plain R, the path to our R wrapper script. Note that usingradianhere does not seem to work.
-
Usage
-
start the VM
-
connect to VM in VSCode
- click the green “Open a Remote Window” icon at the bottom left corner to switch to the remote instance
- select “Connect to Host” or “Connect Current Window to Host”
- then select “vm”
-
open folder of the project
-
click “Open Folder” in Explorer
-
find the project folder and click “Ok”
Figure 13: Open project folder
-
-
open R in terminal
-
if terminal is not ok yet, open one with menu “Terminal” -> “New Terminal”
-
in the terminal (which should already be in the project directory), type
rcwork(for plain R) orrcdwork(forradian) -
then wait until R prompt appears
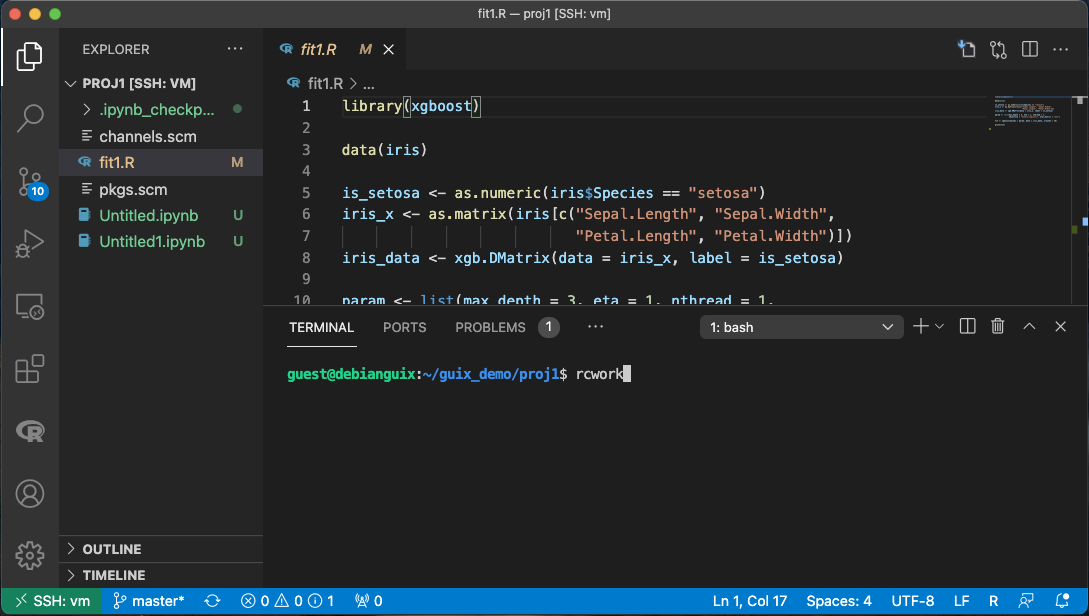
Figure 14: Start R in terminal of VSCode
-
-
then can open any R file that you want to edit, and send code (default key Command+Enter in Mac) to the terminal as needed
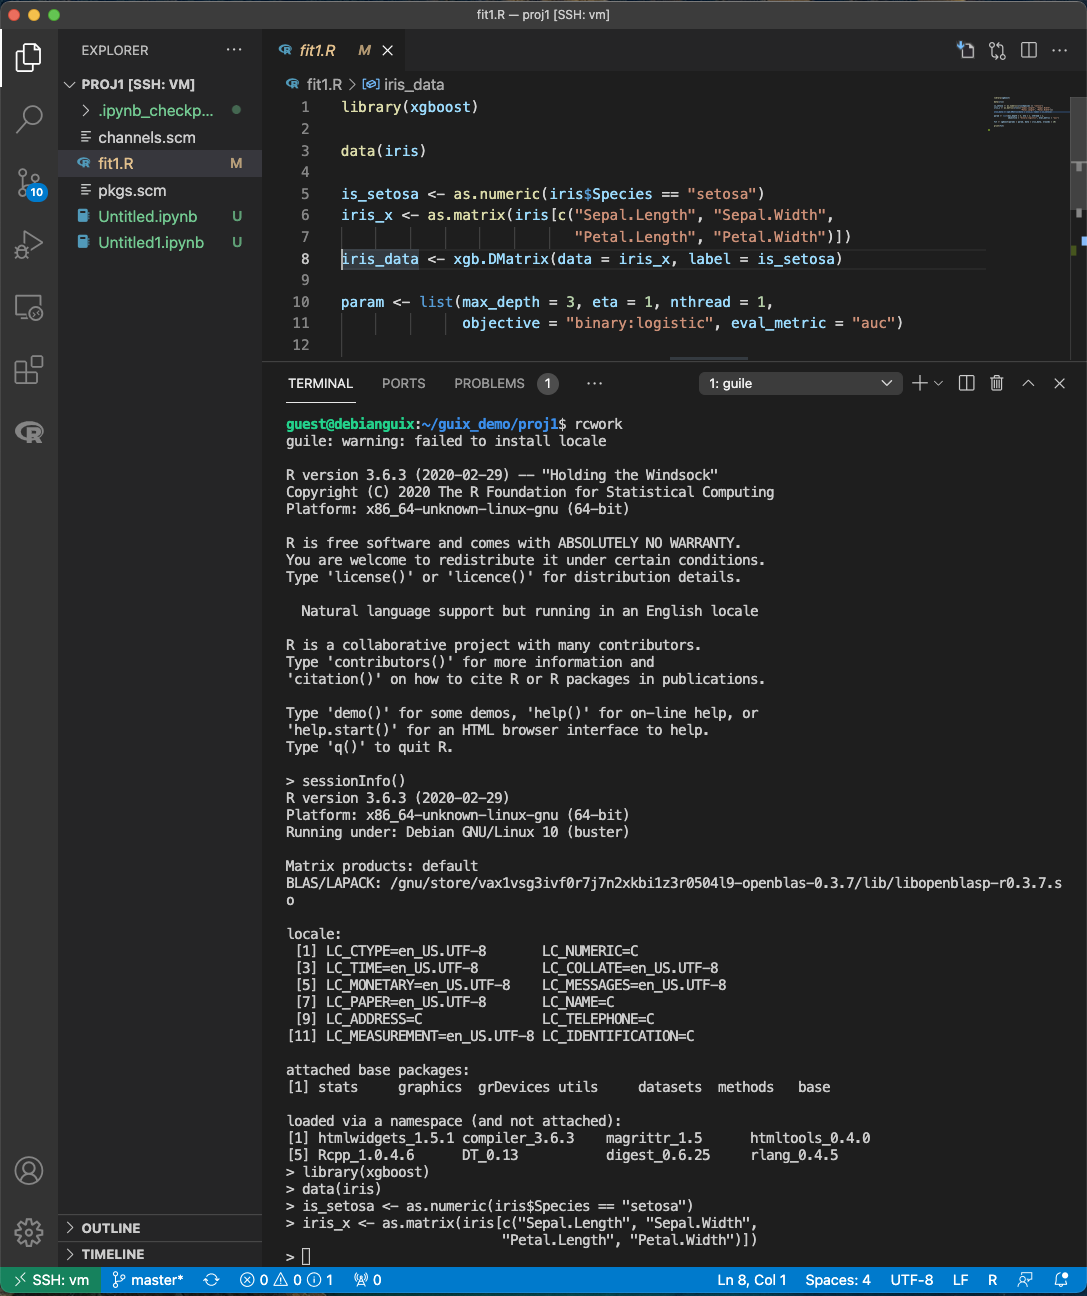
Figure 15: Run R code in VSCode

Figure 16: Auto-completion (partial) by LSP in VSCode
-
when done, close connection
-
click the green icon in the bottom left corner
-
choose “Close Connection”
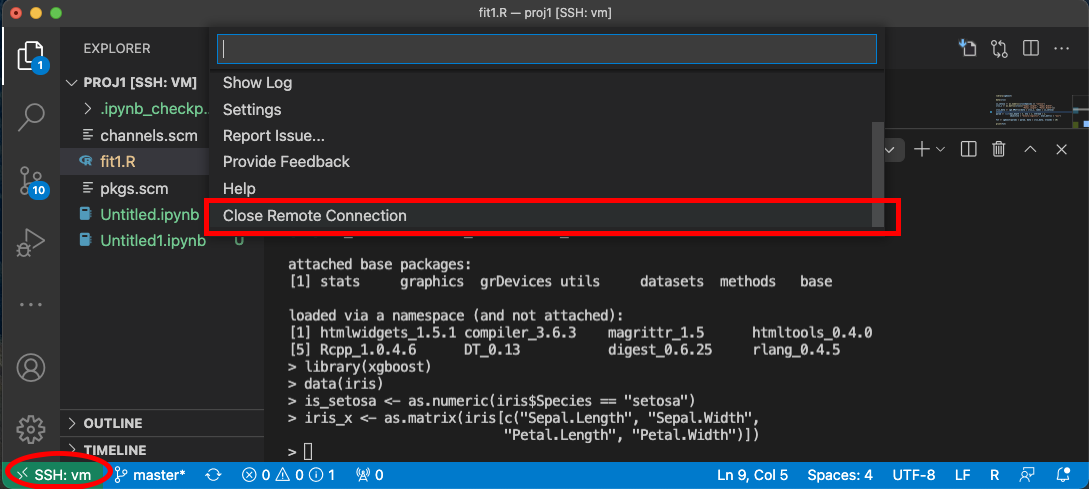
Figure 17: Close remote connection in VSCode
-
Sublime Text 3
Idea
- use sftp extension for editing files in the VM
- open terminal into the vm
- in the ssh session, get to desired directory
- call the command and open R or radian in Guix environment
- use SendCode extension to send part of source file to the terminal (where R is started) to evaluate
Setup
- install Sublime Text 3
- install sftp plugin
-
references:
-
first install “Package Control” under “Tools”
-
https://notepadhelper.com/sublime-text/installation-of-package-control/
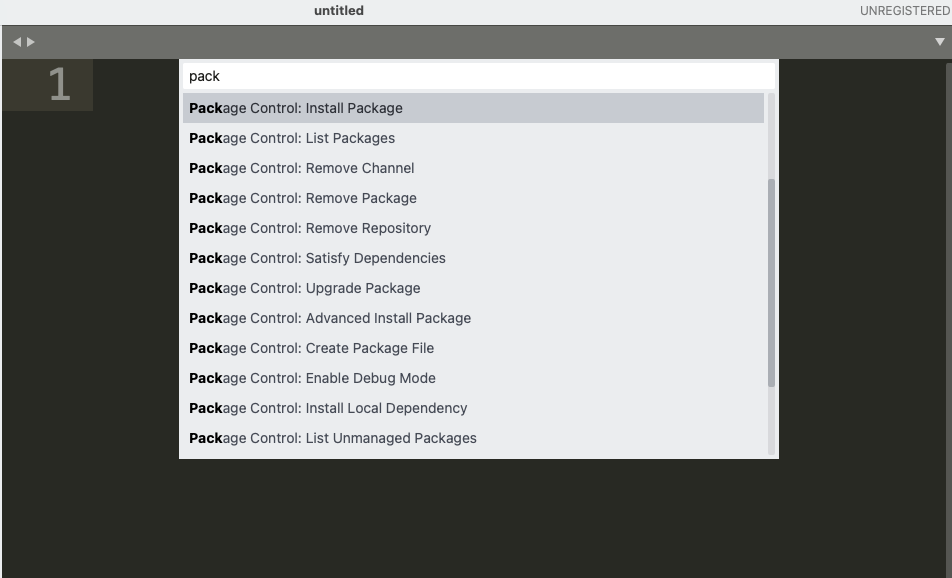
Figure 18: Package Control in Sublime Text 3
-
-
then under “Sublime Text” -> “Preferences” -> “Package Control”, choose “Install package”
-
then type “SFTP”, then it will install
-
setup ssh into the server
- reference: https://codexns.io/products/sftp%5Ffor%5Fsublime/usage
- under “Sublime Text” -> “Preferences” -> “Package Settings” -> “SFTP” -> “Settings”
- under “File” -> “SFTP/FTP” -> “Setup Server”
-
change the “host”, “user”, “port”, “remote_path”, “ssh_key_file” to match the ssh settings
1 2 3 4 5 6 7 8 9 10 11 12 13 14 15 16 17 18 19 20 21 22 23 24 25 26 27 28 29 30 31 32 33 34{ // The tab key will cycle through the settings when first created // Visit https://codexns.io/products/sftp_for_subime/settings for help // sftp, ftp or ftps "type": "sftp", "sync_down_on_open": true, "sync_same_age": true, "host": "localhost", "user": "guest", //"password": "password", "port": "10022", "remote_path": "/home/guest", //"file_permissions": "664", //"dir_permissions": "775", //"extra_list_connections": 0, //"keepalive": 120, "connect_timeout": 30, //"ftp_passive_mode": true, //"ftp_obey_passive_host": false, "ssh_key_file": "~/.ssh/id_rsa", //"sftp_flags": ["-F", "/path/to/ssh_config"], //"preserve_modification_times": false, //"remote_time_offset_in_hours": 0, //"remote_encoding": "utf-8", //"remote_locale": "C", //"allow_config_upload": false, } -
save to
Packages/User/sftp_servers/, e.g. asvm, note it should not have an extension -
create a local folder
-
then map the folder to the remote vm
- open the folder in Sublime Text
- right click on the folder in side bar, select “map to remote”
- then edit the config, similar to the above
- now can sync files between local and VM
-
-
- install Terminus in Sublime Text
- settings:
- “256color” : true
- “unix_term” : “xterm-256color”
- key bindings:
-
take only two here for illustration, can customize as you like
1 2 3 4 5 6 7 8 9 10 11[ // Toggle the default shell in panel { "keys": ["alt+`"], "command": "toggle_terminus_panel" }, // Open a terminal tab at current file directory { "keys": ["ctrl+alt+t"], "command": "terminus_open", "args": { "cwd": "${file_path:${folder}}" } } ]
-
- settings:
- install SendCode in Sublime Text
-
settings: can customize as you like
1 2 3 4 5 6 7 8 9 10 11 12 13 14 15 16 17 18 19 20 21 22 23 24 25 26 27 28 29 30 31 32 33 34 35 36 37 38 39 40{ "prog": "terminus", "auto_expand_line": true, "auto_advance" : true, "auto_advance_non_empty": false, "bracketed_paste_mode": false, "block_start_pattern": "# ?%%|# ?\\+|# In \\[", "block_end_pattern": "# ?%%|# ?\\+|#'|# In \\[", "r" : { "prog": "terminus", // turn bracketed_paste_mode on if radian or readline 7.0 is in use "bracketed_paste_mode": true }, "rmd" : { "prog": "terminus", // turn bracketed_paste_mode on if radian or readline 7.0 is in use "bracketed_paste_mode": true }, "python" : { "prog": "terminus", "bracketed_paste_mode": true }, "julia" : { "prog": "terminal", "bracketed_paste_mode": true } // path related settings // path to tmux // "tmux": "tmux", // path to screen // "screen": "screen" } -
key bindings: add some
1 2 3 4 5 6 7 8 9 10 11 12{ "keys": ["super+enter"], "command": "send_code", "context": [ { "key": "selector", "operator": "equal", "operand": "source" } ] }, { "keys": ["super+enter"], "command": "send_code", "context": [ { "key": "selector", "operator": "equal", "operand": "markup.raw.code-fence.markdown, markup.raw.block.fenced.markdown" } ] },
-
- install LSP in Sublime Text
-
settings:
1 2 3 4 5 6 7 8 9 10{ "clients": { "rlang": { "enabled": true } } }
-
- install R-IDE in Sublime Text
Usage
-
connect sftp to edit files, can sync when saved (if configured so)
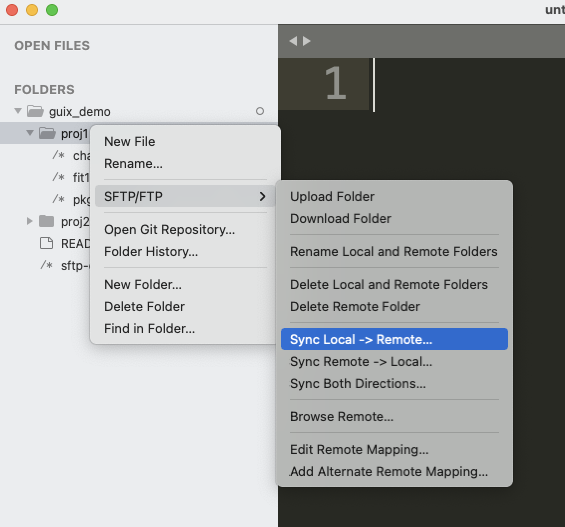
Figure 19: SFTP sync in Sublime Text 3
-
open terminal inside Sublime Text, e.g. by using Ctrl+Alt+t configured above, then ssh into VM by
ssh vm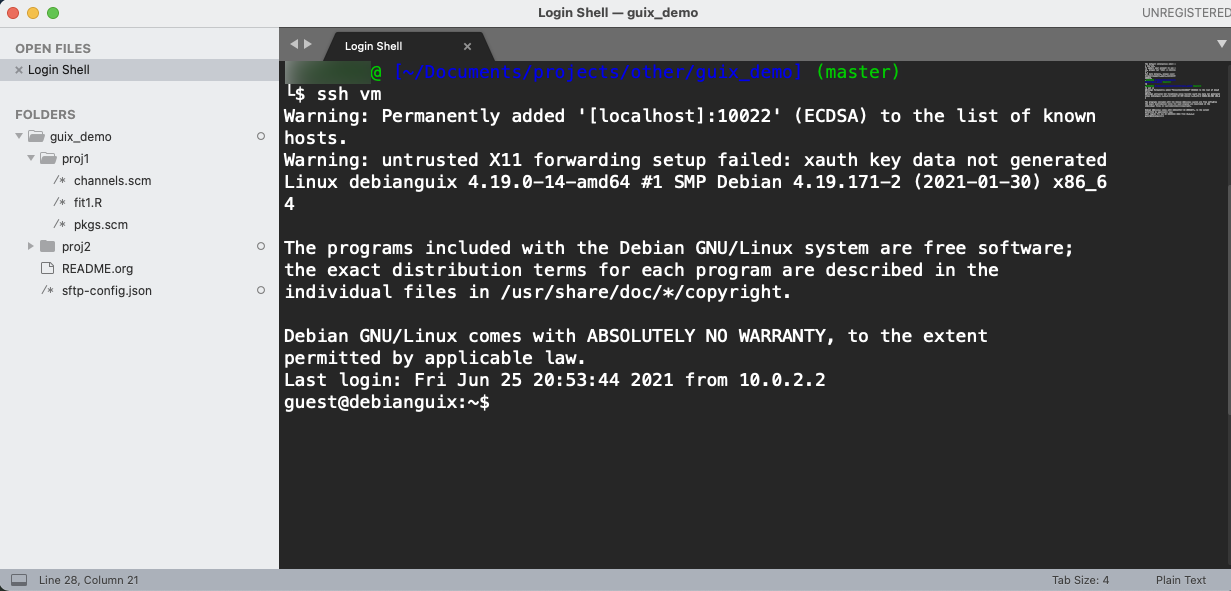
Figure 20: Ssh into VM in Sublime Text 3
-
go to the desired project directory, run
rwork(for plain R) orrdwork(for radian)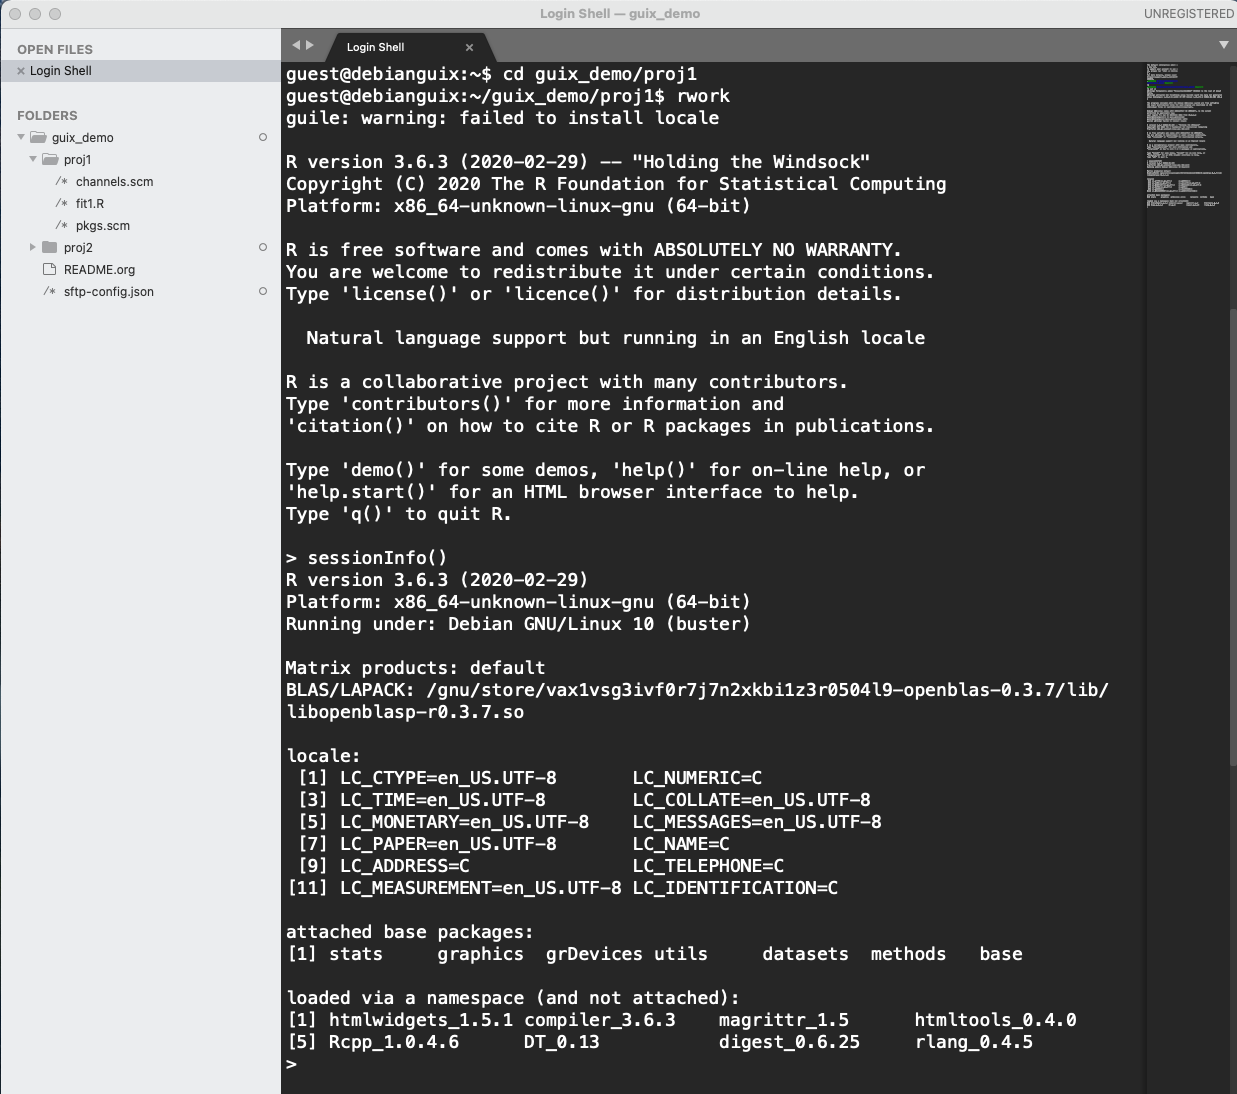
Figure 21: Start R in Guix environment in Sublime Text 3
-
open files to edit, can send text to terminal for evaluation, e.g. with Command+Enter shortcut (for MacOS)
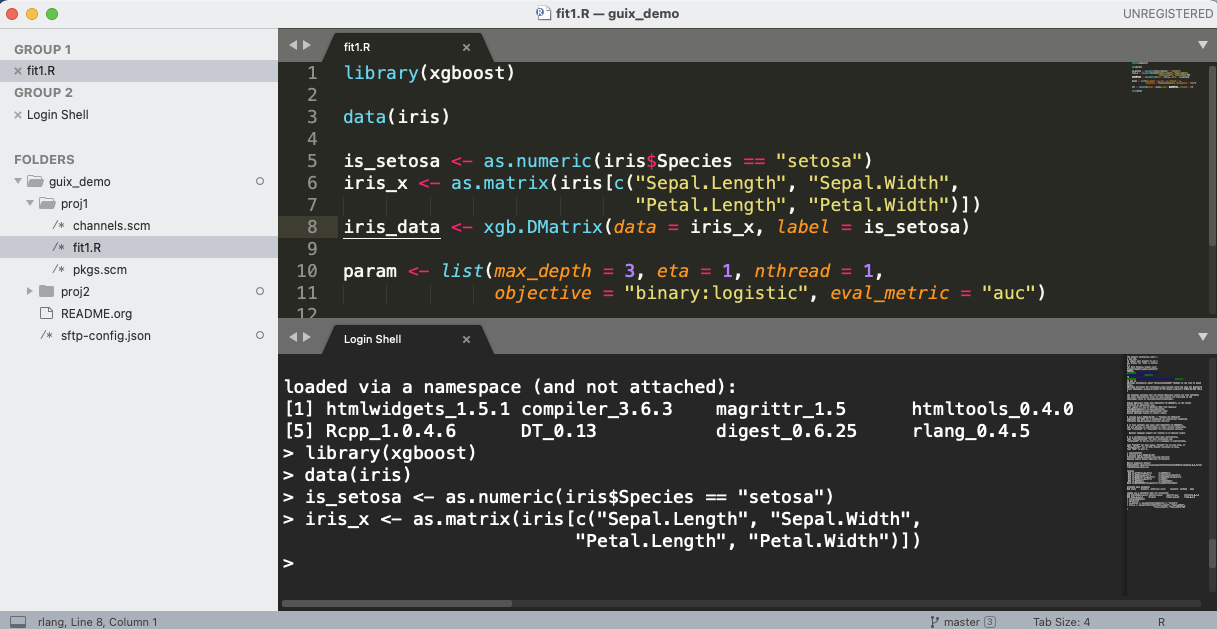
Figure 22: Run R code in Sublime Text 3
-
when done, just exit R with
q()and exit ssh in the terminal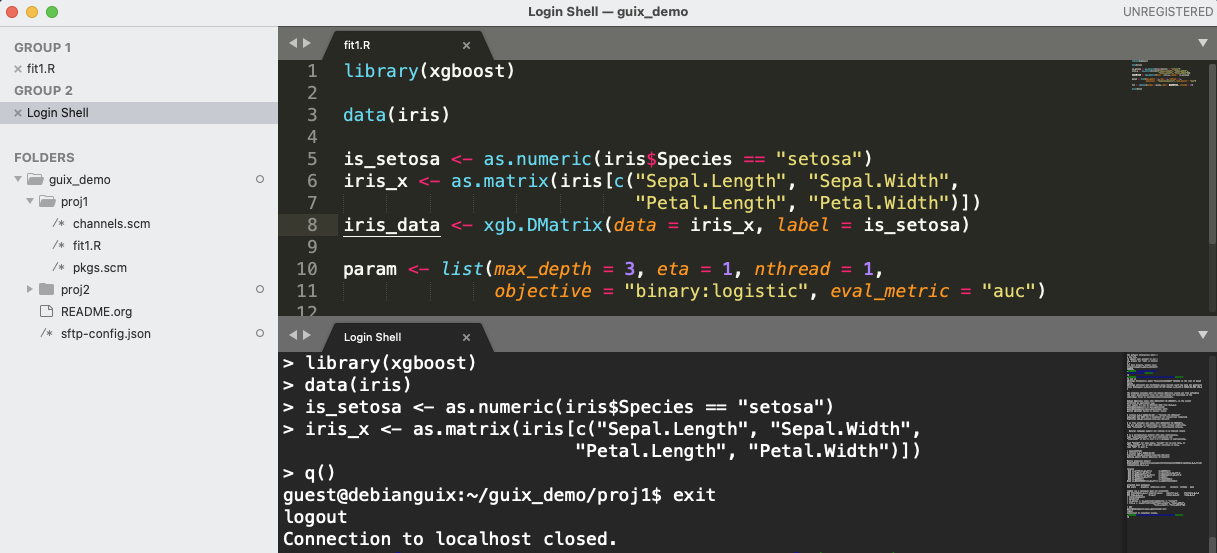
Figure 23: Close remote connection in Sublime Text 3
Emacs
Idea
- use Tramp mode, which can ssh into the VM transparently
- prepare a command (
rworkprepared above) in the VM (an executable shell script) to- find
channels.scmandpkgs.scmfrom the current directory up to root - spawn Guix environment
- execute R, so that we are using the intended environment
- find
- in emacs, change
inferior-R-program-namein ESS to call the prepared command - then should be able to use R in emacs as usual using ESS
Setup
-
customize tramp for convenience, add to
.emacsin host, assuming you alreay use use-package:1 2 3 4 5 6 7 8 9 10 11 12 13 14 15;; For Emacs Speaks Statistics (ESS) to run R (use-package ess :ensure t :init (require 'ess-site) (setq ess-fancy-comments nil)) ;; For connecting in tramp mode to vm (use-package tramp :ensure nil :custom (tramp-default-method "sshx") (tramp-default-user "guest") (tramp-default-host "vm")) (setq inferior-R-program-name "rwork")
Usage
-
use tramp to ssh into the desired directory, e.g.
C-x C-f /sshx:vm:guix_demo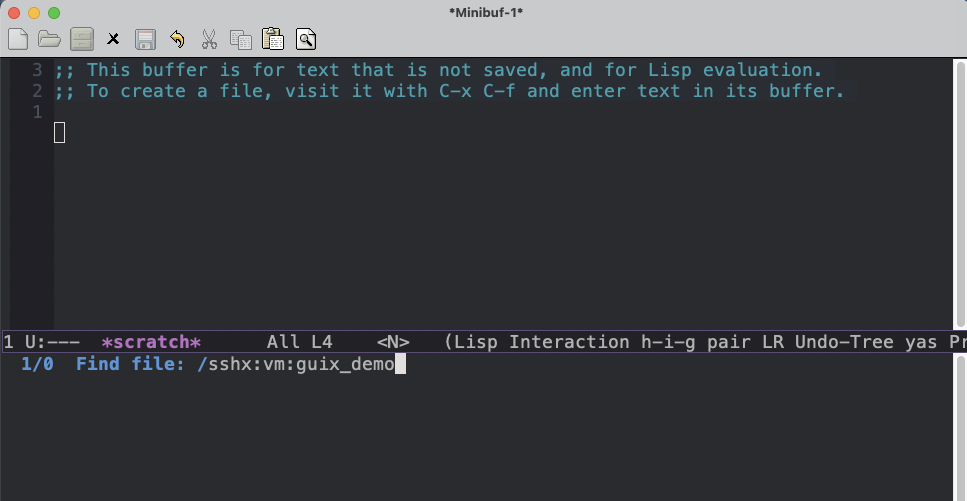
Figure 24: Ssh to remote using tramp in Emacs
-
then navigate to project directory if needed
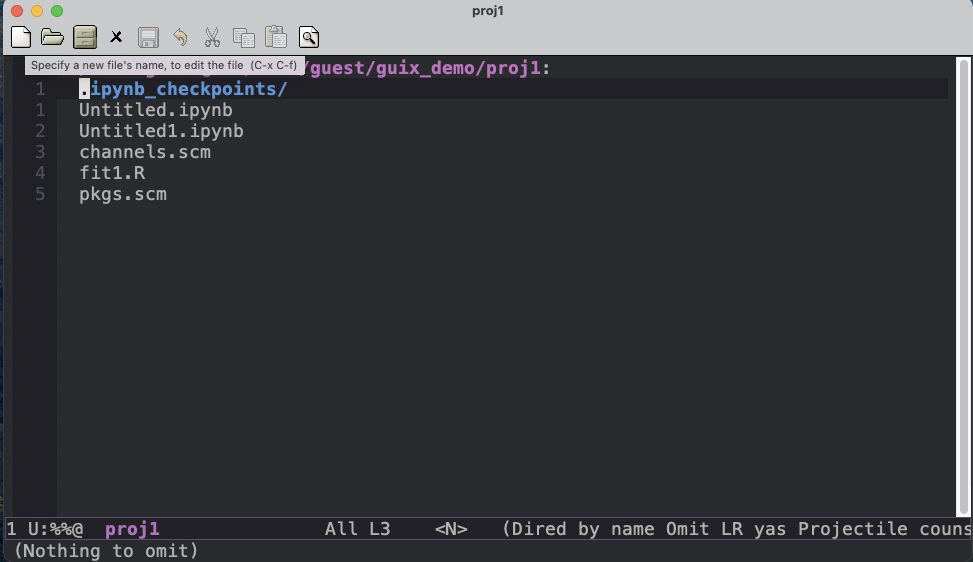
Figure 25: Navigate to project directory using dired in Emacs
-
start R with
M-x R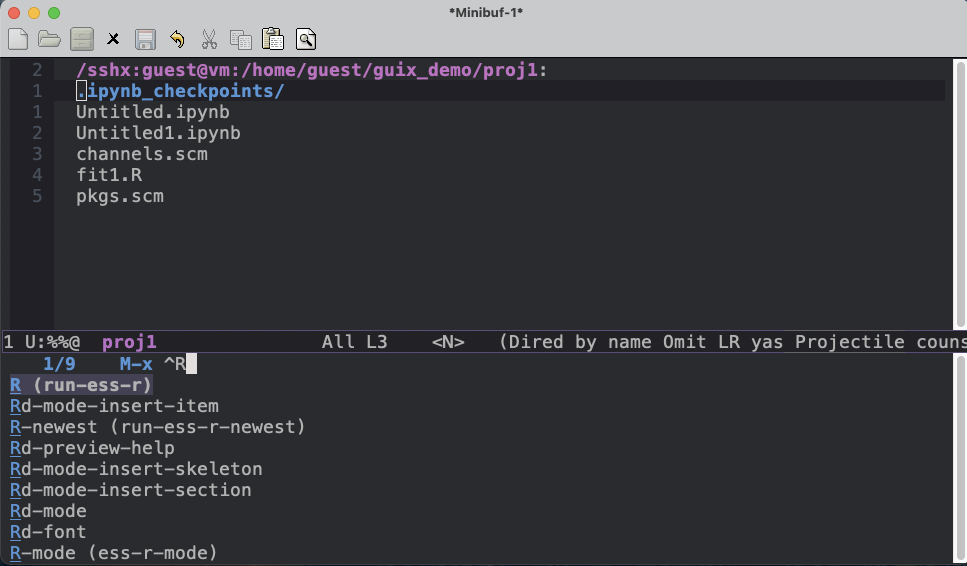
Figure 26: Start R in Guix environment with ESS in Emacs
-
use R in emacs through ESS as usual
-
C-c C-cto evaluate block of code -
C-c C-rto evaluate selected region of code -
C-c C-zto switch back and forth between code buffer and R REPL buffer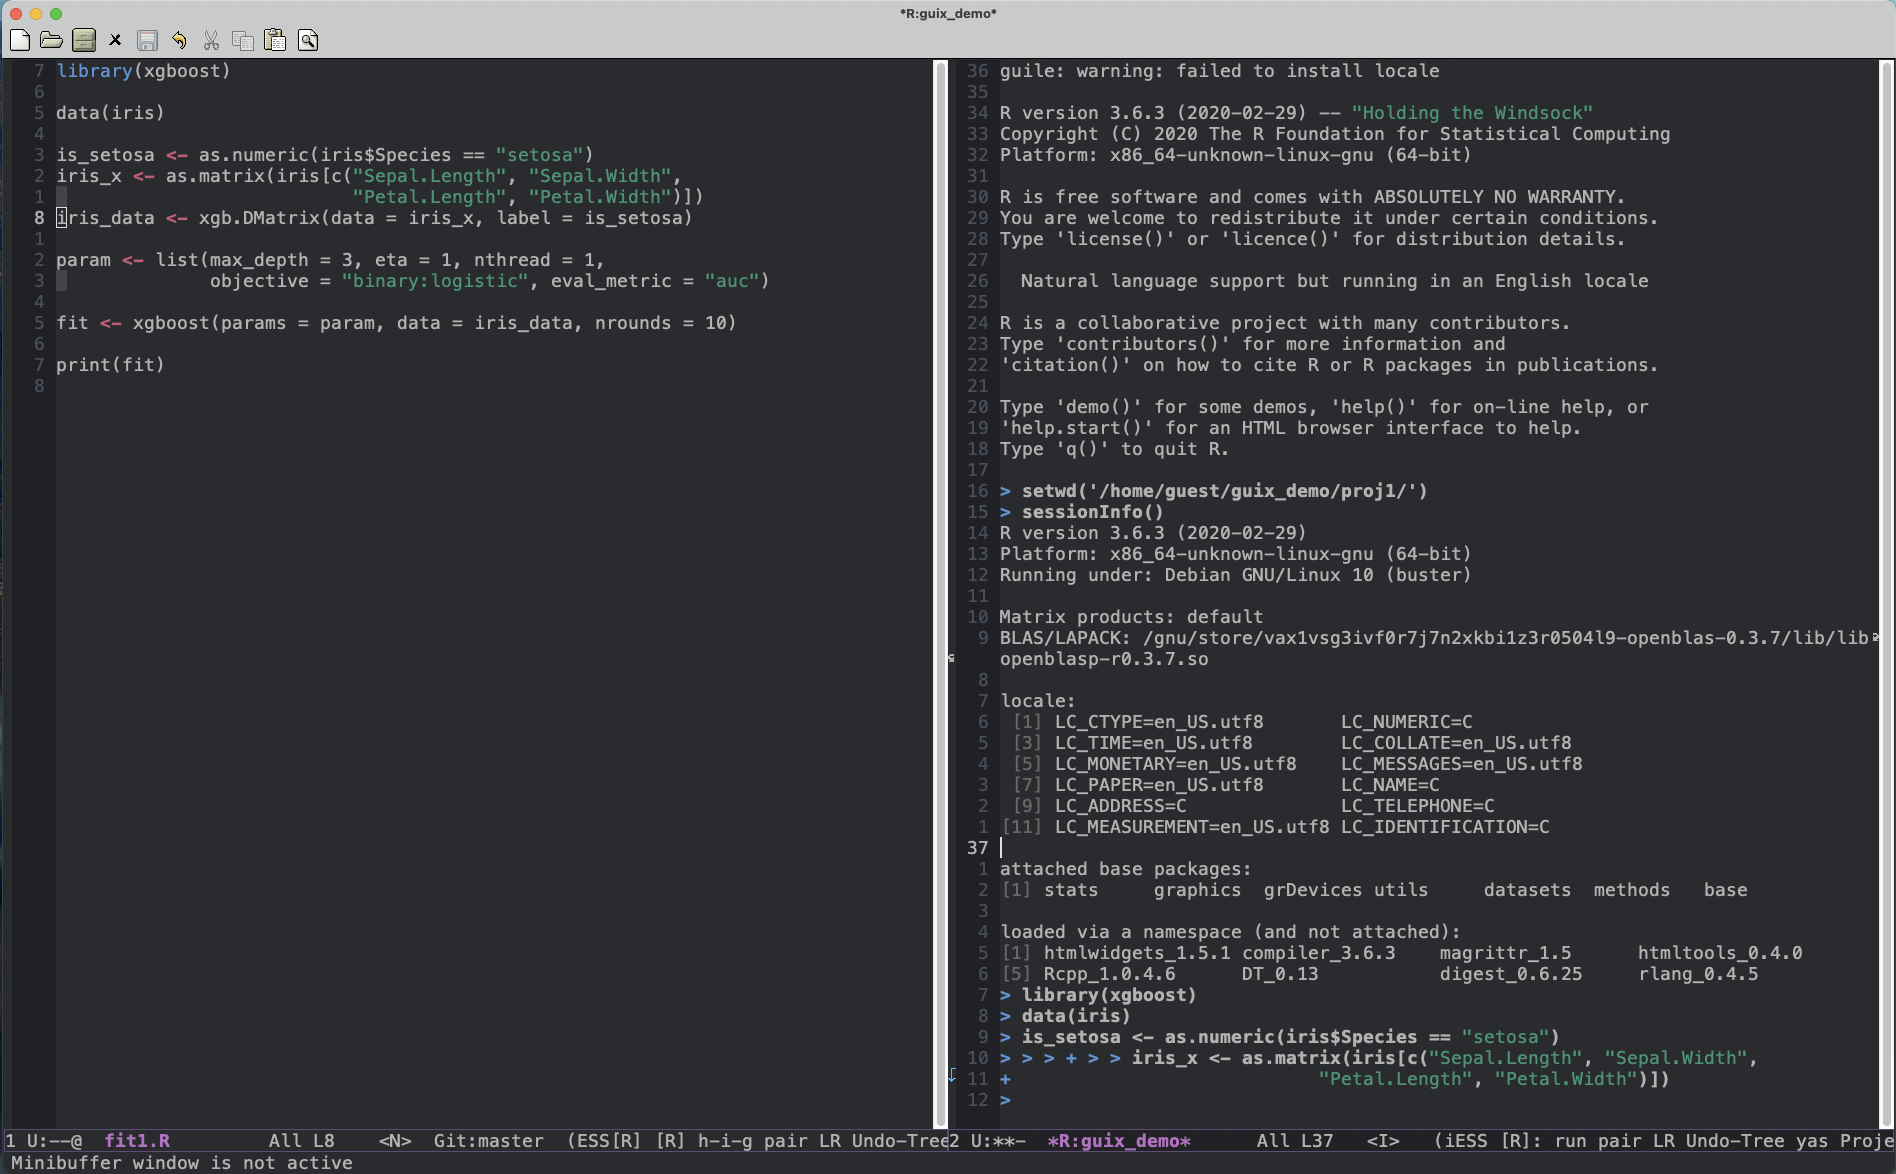
Figure 27: Run R code in ESS in Emacs
-
-
when done, just quit R as usual, e.g. using
q()in the R prompt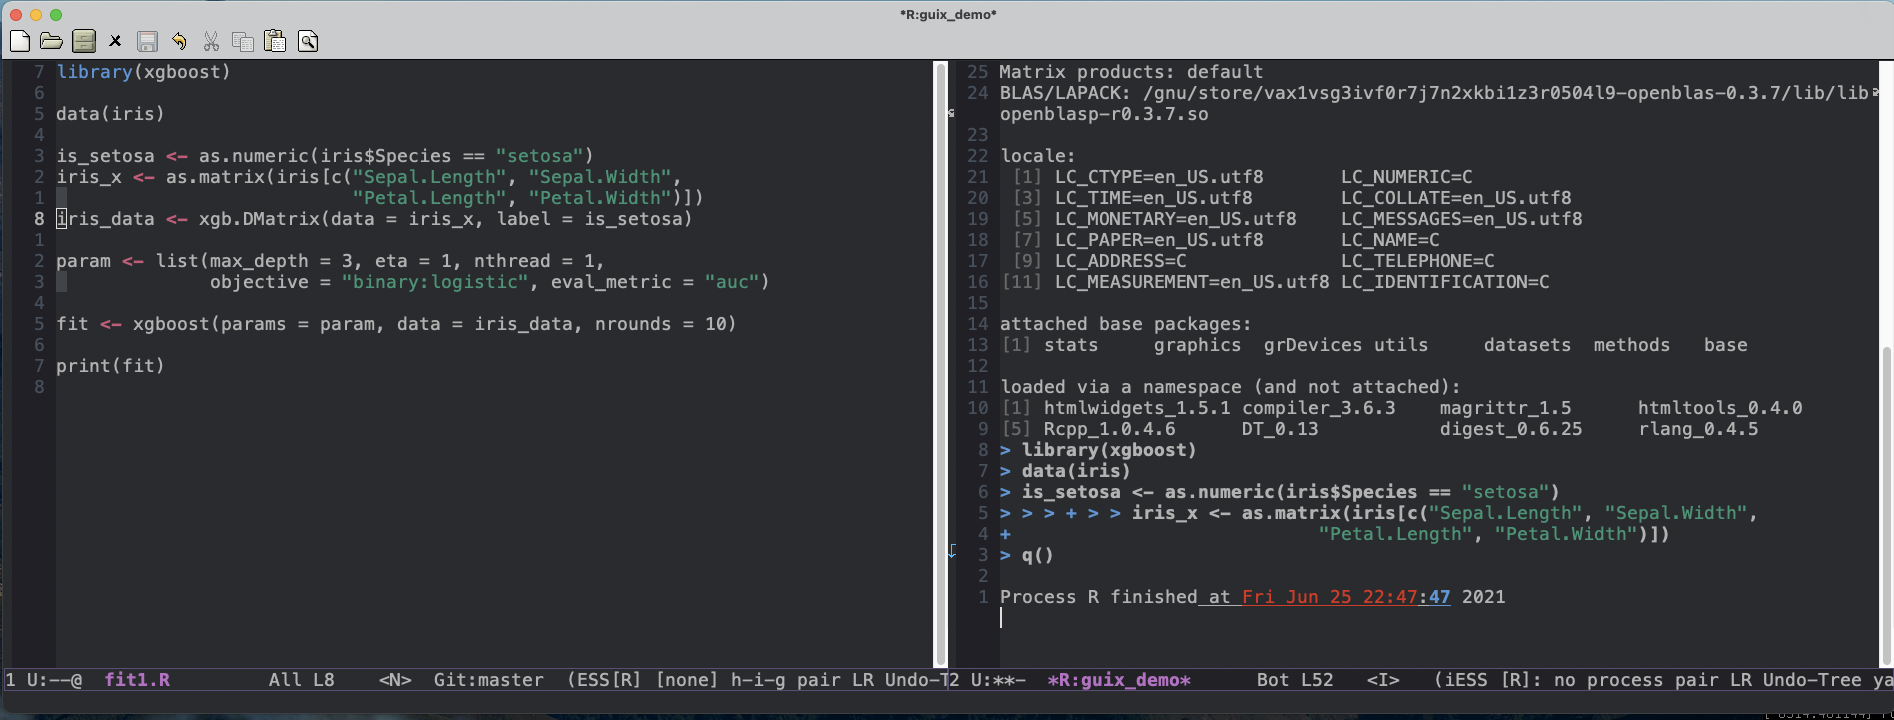
Figure 28: Quit R in Emacs
Un-explored tools
I originally intended to also include RStudio and Vim or Neovim, but did not figure out the details. Nevertheless, I will briefly describe the idea to make them work with Guix for per-project dependency management, for interested readers to explore.
RStudio Desktop
RStudio desktop is commonly used for R development. Since it by
default looks for R in PATH, so starting RStudio desktop in a Guix
environment should just work in getting the needed project
dependencies, although I have not tried it.
- idea:
- start Guix environment using
work - then start RStudio desktop
- work as usual
- start Guix environment using
RStudio Server
RStudio server is an alternative to RStudio desktop version. While the commercial version has a lot of useful features for use in a team, the open source version is much more limited. RStudio server is intended to be run in a shared server allowing access from multiple users, but the open source version does not allow easily switching between different R versions and dependencies. Also, RStudio server has its own wrapper of starting an R session, so it is not straight-forward to use it with Guix for per-project dependency management. Nevertheless, someone has configured it to use conda to manage per-project dependencies, see https://github.com/grst/rstudio-server-conda . Using the same idea should allow using Guix for per-project dependencies instead, but I am only half-way through the configuration, and not finished yet.
- idea:
- use the same idea as in https://github.com/grst/rstudio-server-conda
- the idea is to start RStudio server in non-daemon mode, and does not start it as a service
- then spawn a Guix environment shell with needed dependencies, then start RStudio server
- then can connect in the browser, if we setup port forwarding properly
Vim or Neovim
Since I do not use R inside Vim, I do not bother getting it to work with Guix, but it should be pretty similar to the Sublime Text or VSCode setup.
- idea:
- the Vim or Neovim and related plugins can be installed either in the base Debian, or installed through Guix to the default profile
- ssh into the VM, then get to desired directory, then start Vim or Neovim
- inside (Neo)Vim, use the usual workflow, e.g. open a terminal
- inside that terminal, start
rworkfor plain R orrdworkforradian. - edit and send code to the terminal for evaluation
- when done, just exit the terminal and quit (Neo)Vim.
- reference:
- My colleague Alfred Sam is enthusiastic in using Vim and Neovim for R, Python and Julia development. Interested readers may refer to his two blog posts:
What’s next?
In this part we showed ways of using Guix for per-project dependency for R development, using Emacs, Jupyter lab, VSCode and Sublime Text 3, we also discussed ideas of using Guix with RStudio, Vim and Neovim. This concludes the introduction to Guix, although we still have not covered quite a lot topics. In future posts, we will pick some interesting topics to explore.
Author Peter Lo
LastMod 2021-06-27